If you run more than one Pi-hole server in your network, it can be handy to synchronise both instances so that you do not need to add and maintain your local DNS entries and your ad-block lists on two different machines.
Currently you have two possibilities do achieve this: Orbital-sync and Gravity-sync. Orbital-sync uses the admin interfaces to synchronise. Gravity-sync connects both instances via SSH.
To set up gravity-Sync, you have to do the following:
As a precaution, backup both instances of Pi-hole using the backup function (under Settings, Teleporter tab) and, if you use a virtualisation environment, take snapshots of both instances.
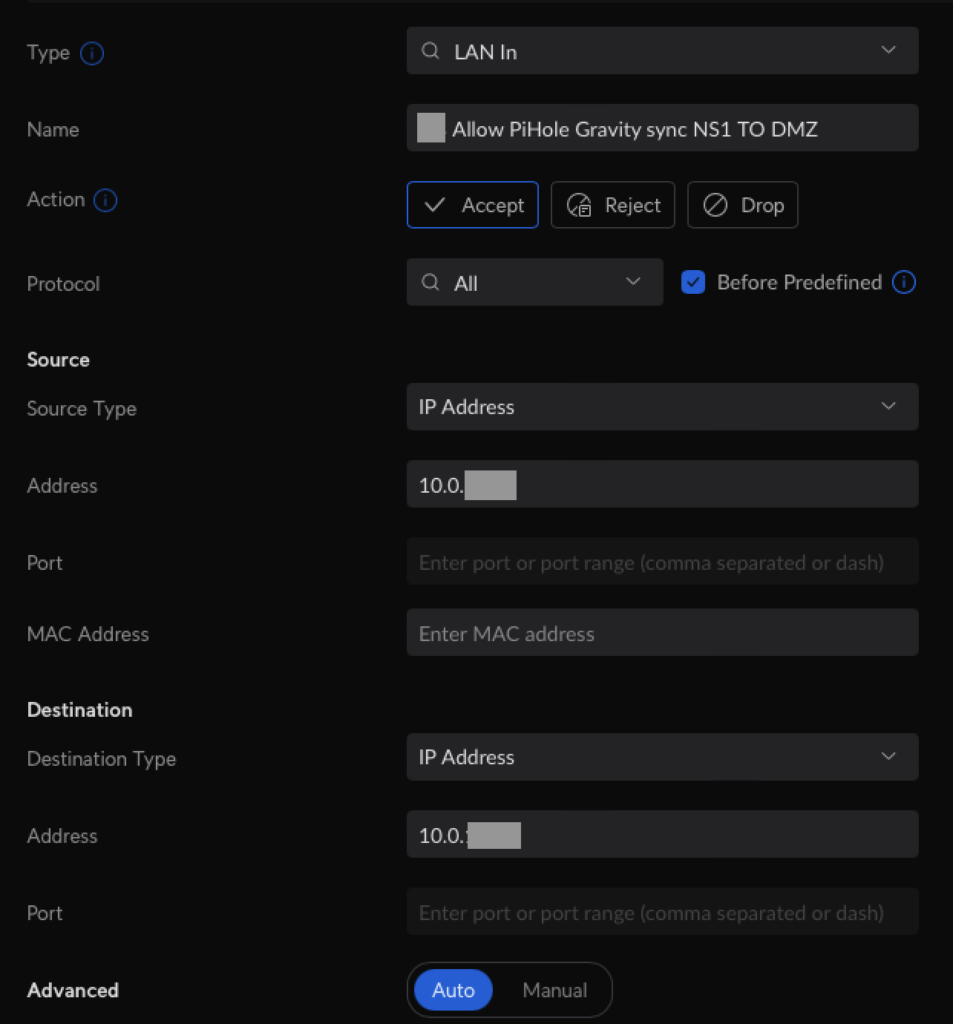
If the two Pi-hole servers are running in different VLAN’s, do not forget to set up the corresponding firewall rules (for both directions).
One of the two firewall rules in my Unifi Dream Machine Pro
On both Pi-hole instances: Install Gravity-sync using this command (source):
A wizard will ask you for the connection information (IP, user, password) for the remote host. The configuration will be saved in /etc/gravity-sync/gravity-sync.conf.
On both Pi-hole instances: Run a comparison of the local and remote Pi-hole databases using:
gravity-sync compare
On your master Pi-hole instance, push the configuration from your master to the slave instance. Be careful not to push a default or incomplete configuration of a new instance to your running instance.
gravity-sync push
On both Pi-hole instance: To automate synchronisation run the following command:
gravity-sync auto
Additionally: to adjust the frequency of updating, run one of the following commands:
gravity-sync auto hour
gravity-sync auto half
gravity-sync auto quad
Do you want to have more control over your network, and maybe separate your IoT devices from your computer and NAS? Then you need to install a router that can handle VLAN’s and gives you more configuration possibilities.
I sorted out my Fritzbox (as a router) and connected my Fiber line (Optical Network Terminal, ONT) to a Unifi Dream Machine Pro (UDMP). Connecting the UDMP directly via SFP+ Fiber module to the Fiber cable entering the house apparently is not supported by the ISP’s in Luxembourg. It seems that they do an additional authentication based on the ONT’s MAC address additionally to the PPPoE authentication.
Internet access configuration
Here’s my setup:
PPPoE configuration for Internet & VoIP
I entered the PPPoE login and password and entered VLAN 35 for incoming traffic. In theory, in Luxembourg Internet access on the WAN side comes through VLAN 35 and VoIP through VLAN 39. But I only configured VLAN 35 and Internet as well as VoIP work on WAN VLAN 35.
This Internet configuration also works with VO’s vDSL Internet access.
You can also activate the IPv6 link using 48 as the prefix. This is experimental. I was able to activate IPv6 but did not (yet) investigate further if it correctly works..
IPv6 configuratiobn
My ISP, Visual Online, provides a public (dynamic) IP as standard. So I do not have a double-NAT situation. Some providers in Luxembourg (like Post) do not offer a public dynamic IP in their standard Fiber package, so these configurations will automatically use a double-NAT situation. If you want to avoid this, you have to book the additional public IP option (NOT the static one but the dynamic public IPv4).
VoIP Phone server configuration
To use VoIP on your phones, you need to have a phone server. Most households in Luxembourg use their FritzBox as the landline VoIP server (if they still have a landline). Alternatively, you might also use FreePBX (or another Asterisk based solution). this is still on my To-Do-list. In the meanwhile, my FritzBox now acts (only) as a Voice over IP phone server behind the UDMP router. Port 1 of the FritzBox is connected to the router, using the internal VoIP VLAN I set up for my phone server and phones. You need to configure this in the Internet / Account information settings. You also have to select other internet provider as your ISP.
Internet account information setup of the FritzBox VoIP server
Here is the working configuration for one of my telephone lines:
Telephony > Telephone Numbers >> Telephone Numbers setting for one of my CID’s
You need to define the Telephony provider, the username, password and FQDN(or IP)/Registrar for your SIP telephony account.
I configured the FritzBox to keep port forwarding enabled every 30 seconds. I do not know if this is absolutely necessary, but with this configuration my VoIP landline works just fine and remains always available.
Keeping the VoIP connection alive
IPTV configuration
I cannot state if IPTV would work using the above configuration as I do not have an IPTV contract.
Note on the FritzBox admin interface access
Normally connecting to the FritzBox’s web interface requires a password only (no username). Be aware, that if you configure the Fritzbox as a normal network client (and not as a router), as in my case, you need to create a user account with username and password to able to access the web interface. If you want to have a backup login possibility, keep the WLAN active, as you should be able to connect through the FritzBox WLAN with the standard admin password without a user login.