Check how much memory is used
free -m
Check how much memory is used
free -mGo to /var/www/html and execute the following command as the http user:
sudo -u www-data php occ db:add-missing-indicessudo -u www-data php occ translate:download-modelssudo -u www-data php occ maintenance:mode --off sudo nextcloud.occ files:scan --allsudo nextcloud.occ maintenance:repairsudo -u www-data php occ -h/usr/local/PPB/bin# ./stopService.sh
/usr/local/PPB/bin# ./startService.sh
/usr/local/PPB/bin# ./restartService.sh
/usr/local/PPB/bin# ./serviceStatus.sh ss -ltnWe are setting up a matrix-synapse instance on our homeserver using an Ubuntu 22.04 VM. Most of these instructions were collected from the official documentation on github. We want to have our domain (example.com) responding for our matrix handle (e.g. @john:example.com), not the hostname (matrix.example.com) of the server.
First install some packages we’ll need:
sudo apt install -y lsb-release wget apt-transport-httpsNow add the keyrings and the repository for matrix-synapse server:
sudo wget -O /usr/share/keyrings/matrix-org-archive-keyring.gpg https://packages.matrix.org/debian/matrix-org-archive-keyring.gpg
echo "deb [signed-by=/usr/share/keyrings/matrix-org-archive-keyring.gpg] https://packages.matrix.org/debian/ $(lsb_release -cs) main" |
    sudo tee /etc/apt/sources.list.d/matrix-org.list
Now update your apt repositories:
sudo apt updateAnd install matrix-synapse
sudo apt install matrix-synapse-py3When asked for the server name, we enter example.com . For further informations on this, consult the first chapter of the installation instructions: Choosing your server name. Decide if you want to have homeserver usage statistics and you are done.
Install PostgreSQL
sudo apt install postgresqlSelect your geographic area. Done. Install the libpq5 libraries:
apt install libpq5To set up the database, you need to be logged in as the postgres user:
sudo -u postgres bashCreate the synapse user
createuser --pwprompt synapse_userCreate a safe password and note it down. Create the database:
createdb --encoding=UTF8 --locale=C --template=template0 --owner=synapse_user synapseLet’s enable password authentication so that synapse_user can connect to the database:
cd /etc/postgresql/14/main
nano pg_hba.conf
Add the (last) line for the synapse_user as follows to the pg_hba.conf file. As we use local, you do not need to provide an address (leave the fourth column empty). Save and exit.
local   replication   all                                peer
host    replication   all        127.0.0.1/32            scram-sha-256
host    replication   all        ::1/128                 scram-sha-256
local   synapse       synapse_user                       scram-sha-256
Exit the shell for postgres user and fall back to your standard user:
exitConfigure synapse to use postgreSQL
cd /etc/matrix-synapse
nano homeserver.yaml
Modify the database parameters in homeserver.yaml to match the following, save and exit.
database:
  name: psycopg2
  args:
    user: synapse_user
    password: <password>
    database: synapse
    host: localhost
    cp_min: 5
    cp_max: 10
Make sure that postgreSQL starts on boot. Open the postgres.conf file:
cd /etc/postgresql/14/main
nano postgresql.conf
Under Connection Settings, uncomment (delete the hash sign) the following line:
#listen_addresses = 'localhost' Save, exit. Now let’s restart matrix-synaose and the postgres service.
systemctl restart postgresql
systemctl restart matrix-synapse
For more information or debugging, consult the official documentation.
We assume that you have a functioning Nginx server. We set up two (see first paragraph of this page for the reason) basic reverse proxy configuration files in /etc/nginx/sites-available, one for the matrix server (matrix.example.com) and one for the domain itself (example.com), using the default files provided. Create the SSL certificates (do not forget to enable the sites first). Do not forget to point the corresponding DNS records to your reverse proxy and allow the firewall to let the incoming connections (port 80 & 443) through.
The matrix.example.com sites configuration file should look like this:
server {

    listen 443 ssl http2;
    listen [::]:443 ssl http2;

    ssl_certificate /etc/letsencrypt/live/matrix.example.com/fullchain.pem; # managed by Certbot
    ssl_certificate_key /etc/letsencrypt/live/matrix.exmaple.com/privkey.pem; # managed by Certbot
    include /etc/letsencrypt/options-ssl-nginx.conf; # managed by Certbot
    ssl_dhparam /etc/letsencrypt/ssl-dhparams.pem; # managed by Certbot


    server_name matrix.example.com;
    access_log /var/log/nginx/matrix.example.com.access.log;
    error_log /var/log/nginx/matrix.example.com.error.log;

   location ~ ^(/|/_matrix|/_synapse/client) {
        # note: do not add a path (even a single /) after the port in `proxy_pass`,
        # otherwise nginx will canonicalise the URI and cause signature verification
        # errors.
        proxy_pass http://<IP OF SYNAPSE SERVER>:8008;
        proxy_set_header X-Forwarded-For $remote_addr;
        proxy_set_header X-Forwarded-Proto $scheme;
        proxy_set_header Host $host;

        # Nginx by default only allows file uploads up to 1M in size
        # Increase client_max_body_size to match max_upload_size defined in homeserver.yaml
        client_max_body_size 50M;

    # Synapse responses may be chunked, which is an HTTP/1.1 feature.
    proxy_http_version 1.1;
    }

}


server {
    if ($host = matrix.example.com) {
        return 301 https://$host$request_uri;
    } # managed by Certbot

    listen 80;

    server_name matrix.example.com;
    return 404; # managed by Certbot

}
The example.com sites configuration file should look like this:
server {

    server_name example.com;
    access_log /var/log/nginx/example.com.access.log;
    error_log /var/log/nginx/example.com.error.log;

    listen 443 ssl; # managed by Certbot
    ssl_certificate /etc/letsencrypt/live/example.com/fullchain.pem; # managed by Certbot
    ssl_certificate_key /etc/letsencrypt/live/example.com/privkey.pem; # managed by Certbot
    include /etc/letsencrypt/options-ssl-nginx.conf; # managed by Certbot
    ssl_dhparam /etc/letsencrypt/ssl-dhparams.pem; # managed by Certbot

# the root folder should redirect to your regular website under your domain name (if needed)
location / {

        proxy_set_header X-Real-IP $remote_addr;
        proxy_set_header X-Forwarded-For $proxy_add_x_forwarded_for;
        proxy_headers_hash_max_size 512;
        proxy_headers_hash_bucket_size 128;
        proxy_pass http://<WEBSERVER>;
        include proxy_params;
     }

location /.well-known/matrix/client {
    return 200 '{"m.server": "matrix.example.com:443"}';
    default_type application/json;
    add_header Access-Control-Allow-Origin *;
}

location /.well-known/matrix/server {
    return 200 '{"m.server": "matrix.example.com:443"}';
    default_type application/json;
    add_header Access-Control-Allow-Origin *;
}
}


server {
    if ($host = example.com) {
        return 301 https://$host$request_uri;
    } # managed by Certbot


    listen 80;

    server_name example.com;
    return 404; # managed by Certbot


}
When configuring your client, use the matrix.example.com URL. The .well-known json message is used by other matrix servers that want to connect to your server. They will be informed that they should use a different hostname than the one provided by the user’s handles. More information is available in the official delegation documentation.
The official documentation states that port 8448 should be open for federation and also listened to by the reverse proxy, but our configuration works fine without it. Maybe the other matrix servers also try port 443 if 8448 is not available?
If your reverse proxy is running on a different machine than the synapse server, than you have to adjust the listeners bind_addresses in the /etc/matrix-synapse/homeserver.yaml to the following. Do not forget to restart the matrix service after saving the changes.
bind_addresses: ['::1', '0.0.0.0']Test delegation / federation using the Matrix Federation Tester.
In order to be able to add users, you need to define the registration shared secret in the /etc/matrix-synapse/homeserver.yaml file. Add the following line at the end, generating some random salt. Restart the matrix service afterwards.
registration_shared_secret: YOURRANDOMSALTSTRINGNow add a user, using the following command:
register_new_matrix_user -u john -c /etc/matrix-synapse/homeserver.yaml -a https://matrix.example.com-u, --user
Local part of the new user. Will prompt if omitted.
-p, --password
New password for user. Will prompt if omitted. Supplying the password on the command line is not recommended. Use the STDIN instead.
-a, --admin
Register new user as an admin. Will prompt if omitted.
-c, --config
Path to server config file containing the shared secret.
-k, --shared-secret
Shared secret as defined in server config file. This is an optional parameter as it can be also supplied via the YAML file.
server_url
URL of the home server. Defaults to ´https://localhost:8448´.Use a matrix client (e.g. https://app.element.io) to test your server and user. Have fun!
When a backup fails, a VM might remain locked. In order to unlock it, issue the following command:
qm unlock <VMID>Disclaimer: this is a very risky operation!
Make sure you have one or more backups of your data!
Use on your own risk!This tutorial will guide you in increasing the space of your virtual disk. Three steps are required:
1. increase the VM disk size in Proxmox
2. change the partition table to reflect the changes in Ubuntu
3. resize your file system in Ubuntu
1.1 Open the Proxmox webinterface, select the VM for which you want to modify a disk size and select the hardware tab. Write down the VM ID (example: 103) and the harddisk identifier (example: scsi0).

1.2 In the Proxmox VM/LC tree, select the parent node. Open the node shell. Resize the VM size using the following command in the Proxmox node’s shell. This step can be done online (VM running) or offline (VM shut down).
qm resize [VM_ID] [DISK_IDENTIFIER] +[SIZE_INCREASE]GExample:
qm resize 103 scsi0 +2000G1.3 Verify that the hardware tab reflects the executed changes in the VM disk size. If you try to add more space than there is available space left on the hard drive, you will get an error (zfs error: cannot set property for ‘vm-103-disk0’: size is greater than available space).
Now that your virtual disk has the desired size, we need to change the partition table so that your Ubuntu will see it.
2.1 Find the disk name of the disk whose partition you want to change inside your VM.
lsblkMy disk (sdb) now has 13.7 TB. You can notice that the partition (sdb1) does not use all the available space yet.

2.2 Before unmounting the disk, make sure that no service uses the corresponding disk. In my case, I preferred to shutdown the Apache service to make sure that no user activity intervenes on the disk.
2.3 Unmount all filesystems of the disk on which you want to change the partition table. We want to change the partition table of sdb, so we have to unmount sdb1 (which is the only partition on this disk).
umount /dev/sdb1
2.4 We will be using fdisk to repartition the disk.

You can run fdisk -l to list all the partitions available.
Inside fdisk, you can use the following commands:

Run the following command to start modifying your partition. Make sure to use the disk (sdb) and not the partition name (sdb1)
fdisk /dev/sdb2.5 Now delete the current partition scheme (that’s scary, isn’t it?) using the “d”-command.

2.6 Create the new partition using the “n” command. We kept the default values and did not remove the ext4 signature.

2.7 Now you need to write the new partition scheme to the disk using the “w” command.

2.8 Now check that the modifications have been saved, using lsblk.
lsblk
You will notice that the filesystem still does not yet see the whole space that is available. Use df -h.

So let’s resize the file system inside the partition sdb1.
Run the resize2fs command on the newly created partition.
resize2fs /dev/sdb1
df -h now reflects the changes:

If you need further information on this topic, consult the following webpages:
Proxmox Wiki: Resize disks
How to Increase VM Disk Size in Proxmox
Resize partitions in Linux
Why df and lsblk command have different results?
In the wish to integrate our Grünbeck water softener softliQ:SD18 into openHAB I tried the existing community binding with unfortunately no success. So I chose the MQTT way with the help of ioBroker. The way data transits from our water softener to openHAB might not be as straightforward as a direct binding, but it works just fine.
The data arrives in openHAB through the following workflow:
Water-softener => Grünbeck cloud => ioBroker => MQTT broker => openHAB
This might sound complicated, but in fact it is not. It just assumes certain requirements.
To integrate data from your water softener into openHAB, you need to have the following appliances set up:
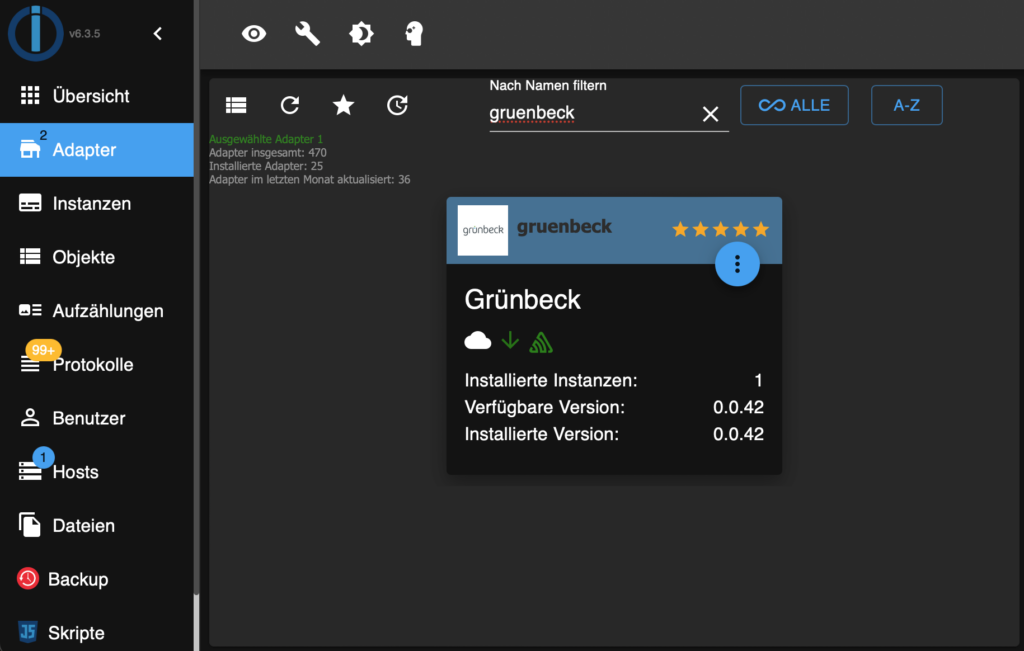
In order to receive data from your Grünbeck cloud in ioBroker, you have to install the Grünbeck adapter in ioBroker. In ioBroker, click on Adapter and search for Grünbeck. Just hit the vertical three dots and then click the “+”-sign.
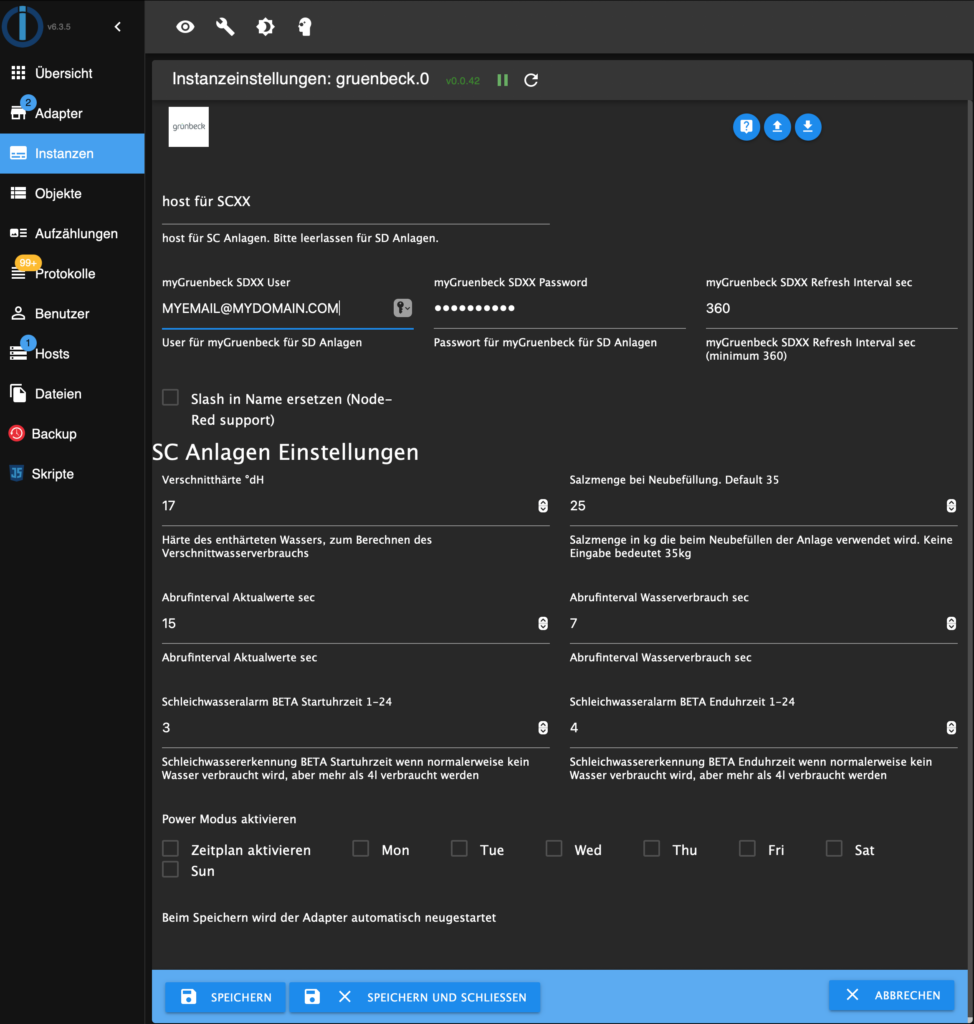
Now go to the Instances tab and fill in your connection data to the Grünbeck Cloud. Your Grünbeck Cloud Username and password are sufficient if you use an SD device.
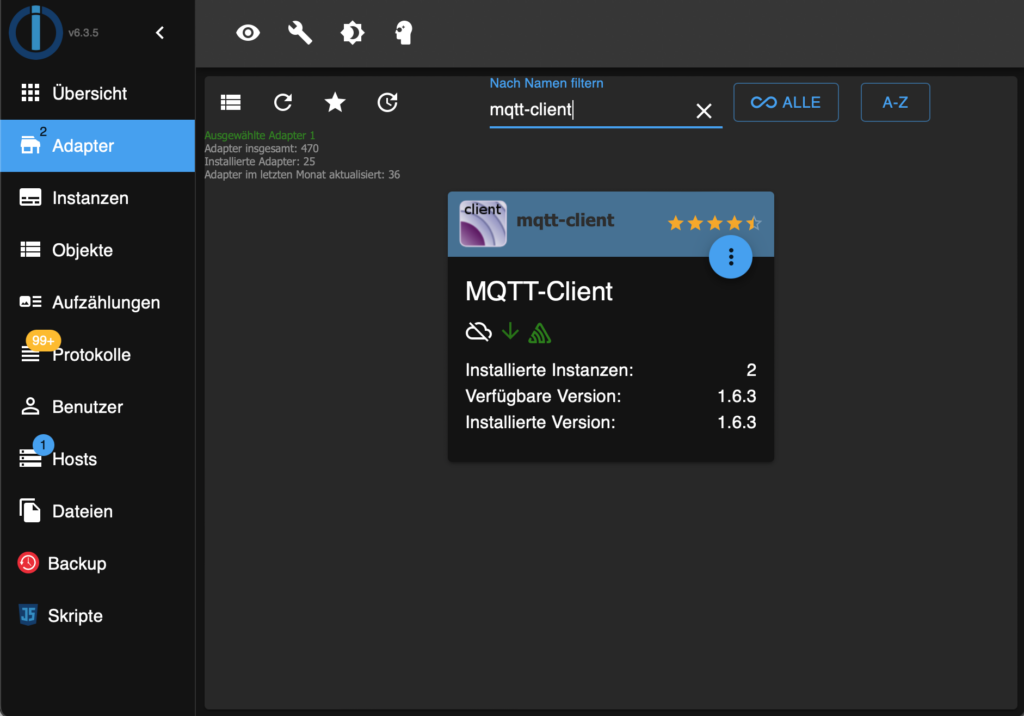
Install the MQTT-client adapter in ioBroker in the same way you did for the Grünbeck cloud adapter.
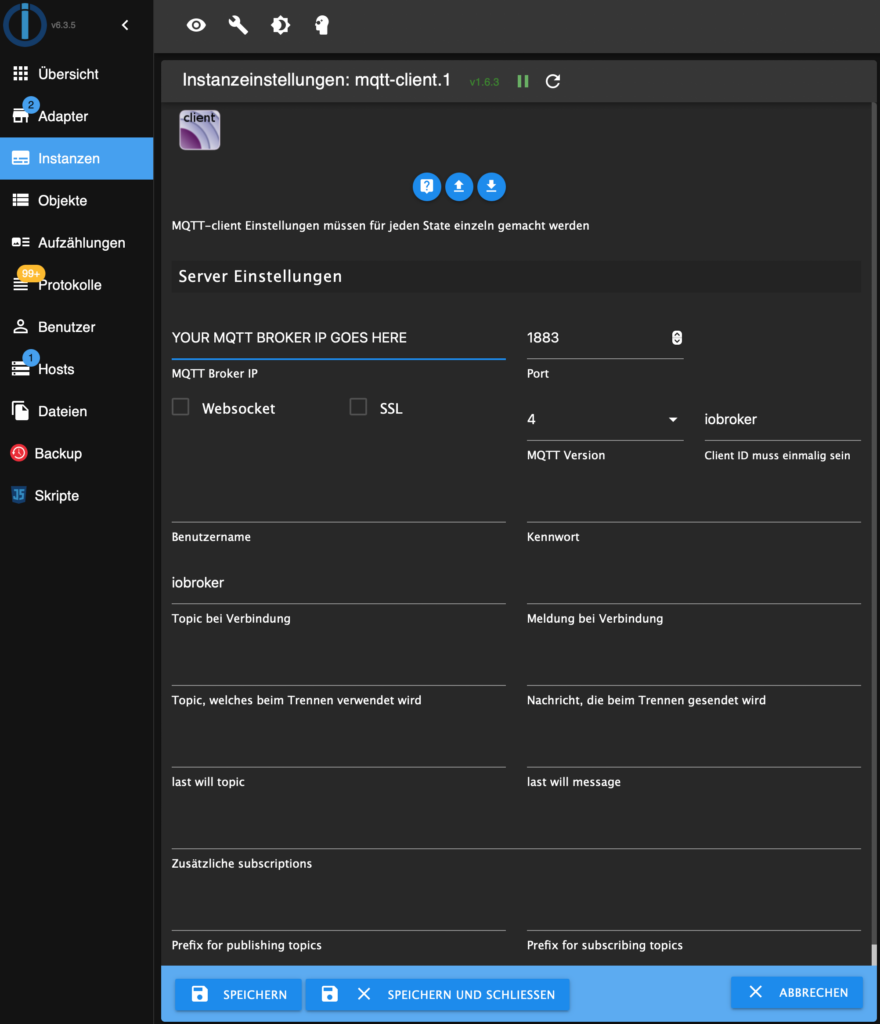
Configure the access data for your MQTT broker in the newly installed MQTT-client instance. MQTT broker IP-address and port are sufficient, if you do not use authentication.
Now you have to tell ioBroker which information from the Grünbeck adapter you want to have sent to your MQTT broker. If your Grünbeck adapter is correctly configured, your object list should show similar data points like these:
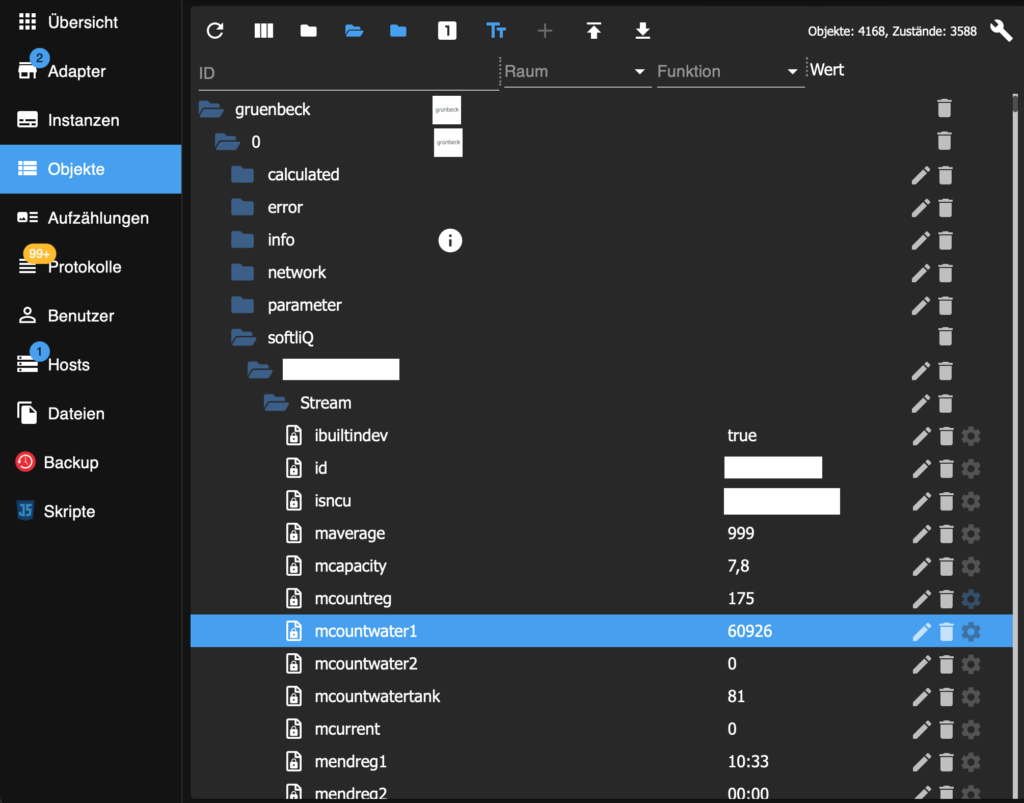
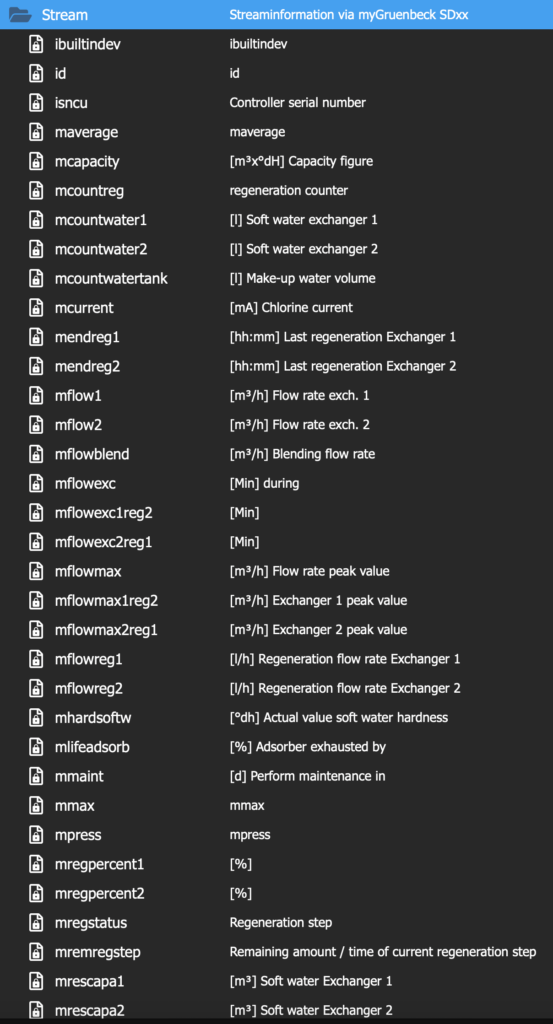
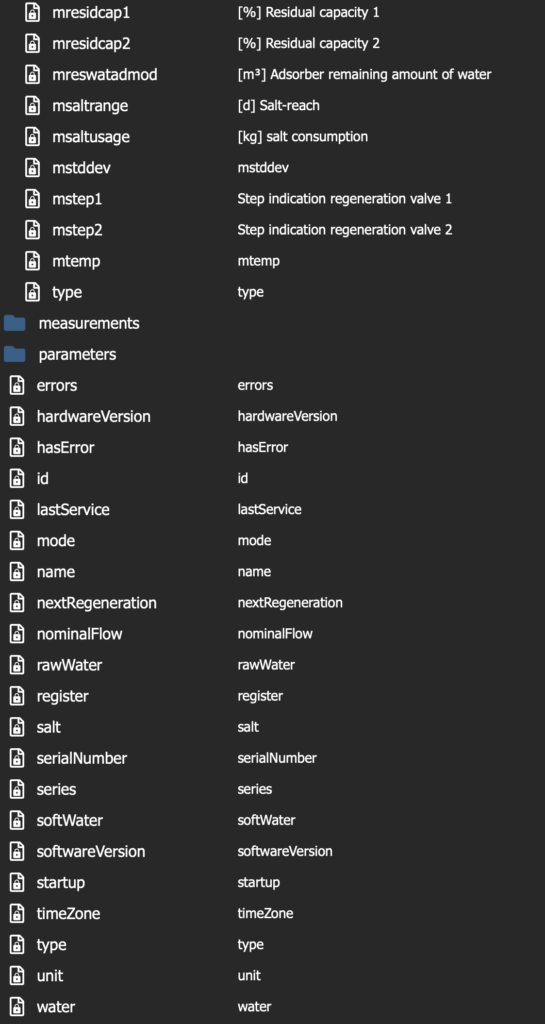
The first subfolder under softliQ gives you information about your device (I hid the name of the folder as it is the serial number of the device). In my installation, this folder includes three subfolders named Stream, measurements and parameters. You have to browse these folders and find out what the different objects mean.
Let’s say you want to have the water counter sent to your openHAB instance. The Stream subfolder includes an object named mcountwater1. This object is the water counter (in liters). You have to click on the gear at the end of the line listing this object (see selected line in the above screenshot).
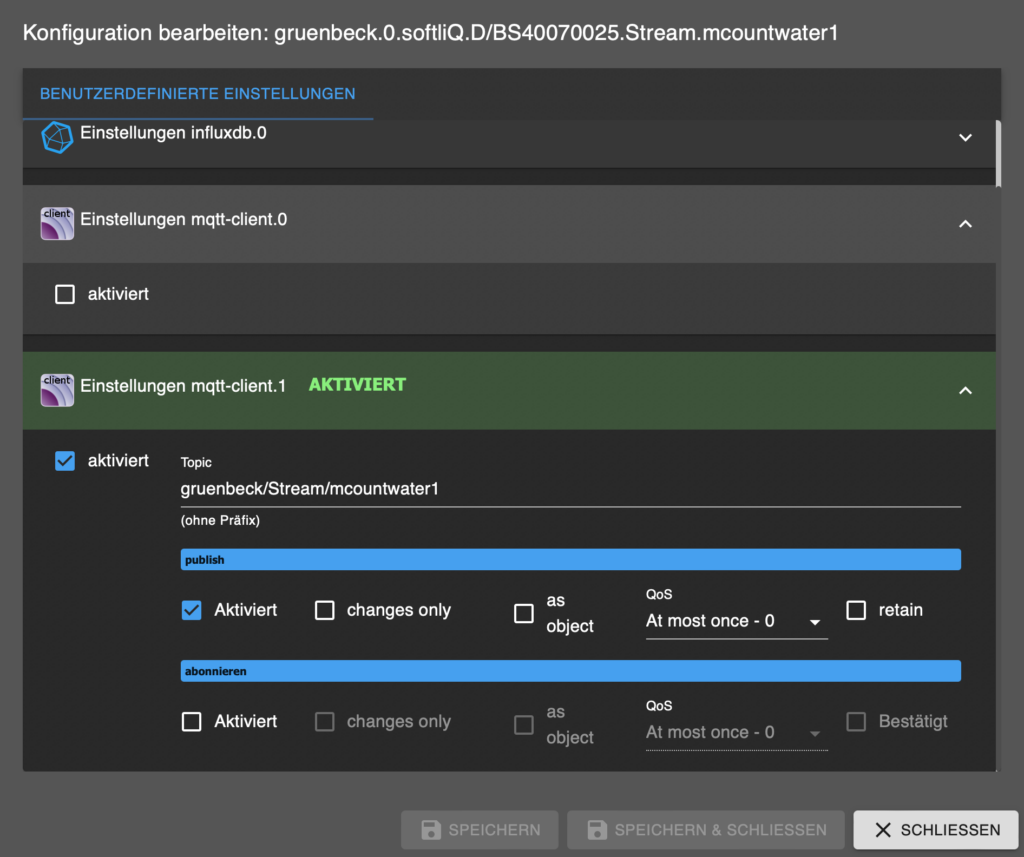
You should see a menu point for your MQTT client (probably mqtt-client.0, if you have only one MQTT client defined). Define a Topic for this object and activate it. You can freely make the topic tree in MQTT fit to your needs. ioBroker suggests quite a long one based on the structure in the object list. I prefer to reduce the number of subtopics to make it more easily readable.
After saving the MQTT info, your MQTT browser (I use MQTT Explorer) should show the requested data in a few seconds. The following two images show what data points are available in the Stream folder and general folder for my SD18.
To read MQTT telegrams in openHAB, you need to install the MQTT binding. Go to openHAB’s administration settings, Add-ons: Bindings and install the MQTT binding.
To start, you need to add an MQTT Broker bridge. Go to the things tab and add a thing based on the MQTT binding. Select MQTT Broker. Give it a name (example: MQTT bridge). Enter the IP address of the MQTT broker. Save.
Now add a Generic MQTT Thing. Give it a name (example: Grünbeck water softener) and link it to the above created bridge. Save. We will use this thing to centralise all Grünbeck data from our water softener.
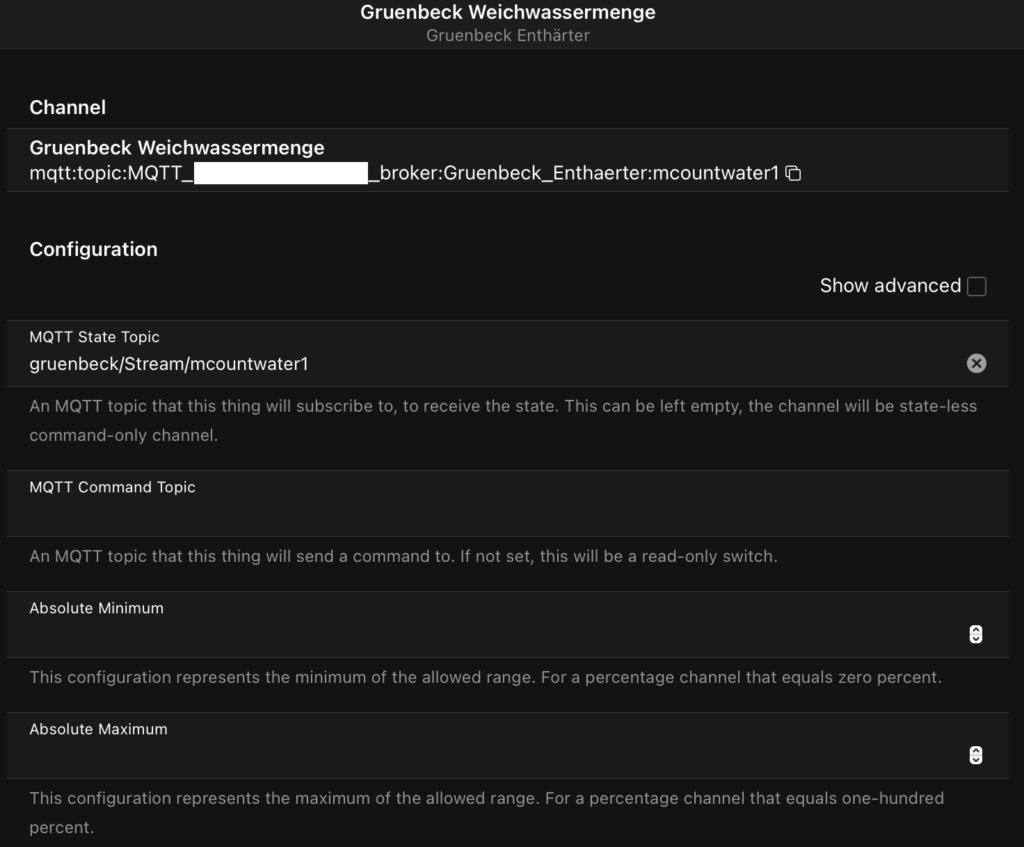
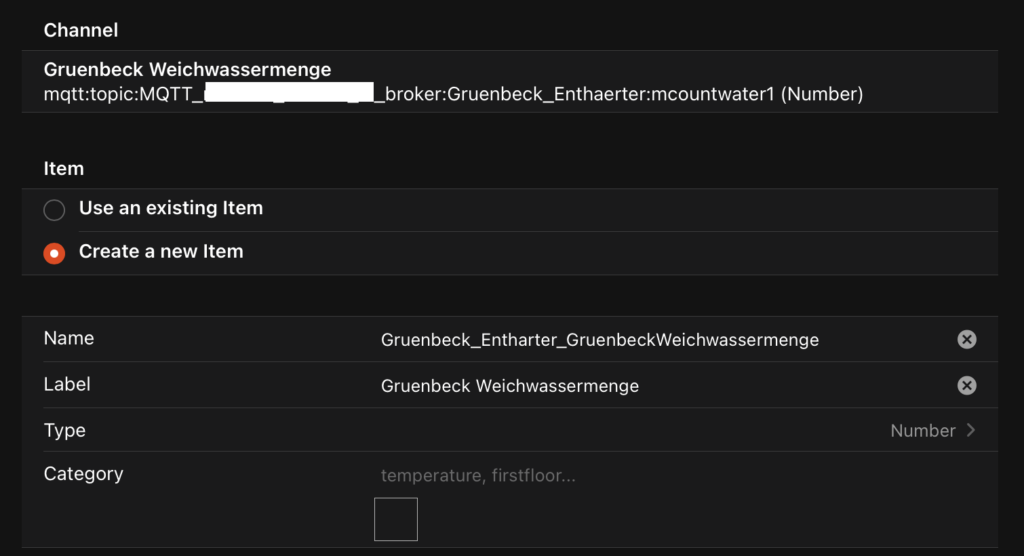
Now select the Channels tab in the thing you just created. Click on Add channel and enter for the MQTT State Topic the Topic information you defined in the MQTT settings for your Grünbeck object in ioBroker. If you like, you can add your Unit of Measurement (Show advanced). Click Done.
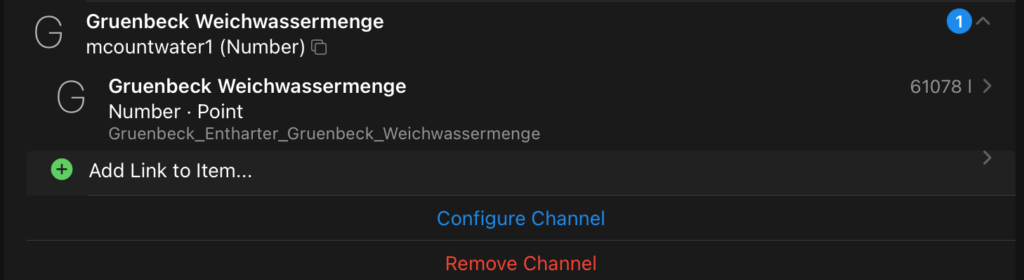
Now add a Link to an item to this channel.
Now your item should show the amount of water treated by the water softener.
Add all the channels that you need and integrate the items to your sitemap in openHAB.
If you want to use a meta-search engine that does not track you, SearXNG is an excellent possibility.
To install SearXNG on Ubuntu, I chose to go the docker way described in the official instructions. Unfortunately, I run into some issues, thus deciding to setting up this extended tutorial. I assume you have docker and docker-compose installed.
cd /usr/local
git clone https://github.com/searxng/searxng-docker.git
cd searxng-dockerEdit the .env file living in the root foled. Be aware that it is hidden. to see the file, you need to use ls -la. Edit the file with: nano .env
# By default listen on https://localhost
# To change this:
# * uncomment SEARXNG_HOSTNAME, and replace <host> by the SearXNG hostname
# * uncomment LETSENCRYPT_EMAIL, and replace <email> by your email (require to create a Let's Encrypt certificate)

SEARXNG_HOSTNAME=searxng.mysite.com
LETSENCRYPT_EMAIL=myaddress@mysite.comsed -i "s|ultrasecretkey|$(openssl rand -hex 32)|g" searxng/settings.ymlYou can see your new key in searxng/settings.yml .
To change the IP address and port, you need to edit the docker-compose yaml file.
nano docker-compose.yml.
Find the searxng chapter and change the 127.0.0.1:8080/8080 to whatever you prefer. Leaving the standard values (with no port collisions) left me without the ability to access the searXNG engine. So I replaced 127.0.0.1 by 0.0.0.0.
  searxng:
    container_name: searxng
    image: searxng/searxng:latest
    networks:
      - searxng
    ports:
- "0.0.0.0:8888:8080"Check that everything is working
docker-compose upStart the daemon in the background with:
docker-compose up -dIf you want your searXNG engine to start on boot you need to start it with systemd.
cp searxng-docker.service.template searxng-docker.service
systemctl enable $(pwd)/searxng-docker.service
systemctl start searxng-docker.serviceTo avoid using a port number in the URL, I have my NGINX reverse proxy forwarding all requests to the docker image. As I then ran into the “too many requests” error, I had to set the limiter to false in the searxng/settings-yml file . If you want to run your instance outside your intranet, you should definitely protect your searXNG instance with an authentication method to avoid having your server flooded with un uncontrollable amount of requests.

docker container listIt should list your searXNG container:
CONTAINER ID   IMAGE                     COMMAND                  CREATED             STATUS              PORTS                    NAMES
YOUR_ID searxng/searxng:latest "/sbin/tini -- /usr/…" 43 minutes ago Up 43 minutes 0.0.0.0:8888->8080/tcp searxng To display the logs of all your running containers, use:
docker-compose logs -fIf you want to only display the logs of one of the specific containers used for searXNG, use one of the following commands:
docker-compose logs -f caddy
docker-compose logs -f searxng
docker-compose logs -f redisTo update your searXNG instance, do the following:
docker-compose pull
docker-compose down
docker-compose upIn search to connect our Buderus boiler (heating, warm water system, hot water solar panels) to openHAB, I stumbled over an EMS gateway developed by a dutch engineer.
I ordered the Wifi edition and connected it via the mini-jack cable to the boiler system. The boiler system also delivers power to the gateway over this cable.

The connection to the WIFI network was straight forward (chapter 8.1 of the manual) and the gateway automatically detected all the devices connected to our boiler. It immediately started displaying live data from the boiler.
We will use MQTT to send the boiler data to the openHAB system: the EMS gateway will send the boiler data to the MQTT broker which relays it onto the network. openHAB then needs to listen to this telegrams and interpret them.
Installing Mosquitto in an ubuntu VM was straight forward:
sudo apt-get install mosquitto mosquitto-clientsIf you run the MQTT broker behind a firewall, it might not be necessary to force authentication. Entering the IP address and port of the MQTT broker in the gateway was straight forward. Do not forget to define a base, a kind of a channel on which MQTT will broadcast your telegrams. I chose ems-esp. The gateway then immediately began sending the boiler data to the broker.
3a: Go to openHAB’s administration settings, Add-ons: Bindings and install the MQTT binding.
3b. Go to openHAB’s administration settings, Add-ons: Other Add-ons, Transformation Add-ons and install the JSONPATH Transformation.
4a.1: From this step on, you can either add a “HomeAssistant MQTT Component” which auto-detects all EMS things. In order for this to work, you need to activate the “MQTT Discovery (Home Assistant, Domoticz)” in the MQTT settings in the EMS gateway.
4a.2: I decided to go the manual way to have full control over the things and items to add to openHAB.
You need to add an MQTT Broker bridge. Go to the things tab and add a thing based on the MQTT binding. Select MQTT Broker. Enter the IP address of the MQTT broker. Save.
4b. Then add a Generic MQTT Thing. I linked it to the above created bridge. To have a better overview, I created a generic thing for the boiler, one for the warm water and one for the solar data.
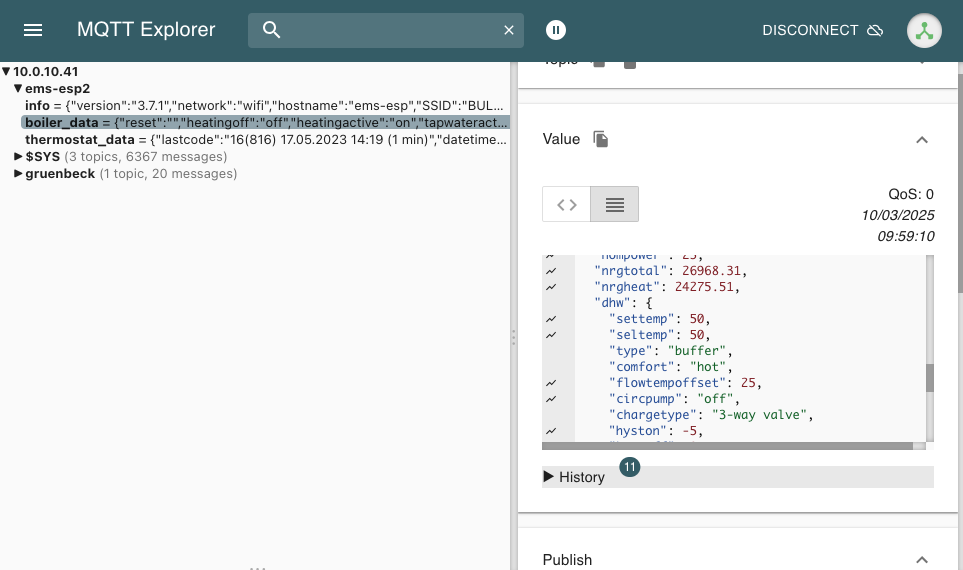
4c: Now you have to add the data points that you want to import into openHAB as items. If you don’t know which data points are available, use an MQTT Explorer to get a better insight into your data.

4d: For each data point, you need to define a channel in openHAB. Open the MQTT generic thing that you created, click on the channel tab, and click add channel. Add the channel identifier, the label and select the corresponding channel type. In our example, we select Number Value, as we want to catch a temperature value.

The MQTT State Topic‘s first part is the base that you defined in the MQTT broker settings in the EMS gateway. In our case: ems-esp. The second part of the topic gives more details about the object you want to catch. Your MQTT explorer will help you determine which information telegrams are available.
In order to precise which value of the current object you want to import, you have to click the Show advanced check box.

As the object information is received in JSON format, you have to use JSONPATH Transformation to catch the exact value that you need (do not forget to install the JSONPATH tranformation, see 3b above). In our case, enter JSONPATH:$.curflowtemp under Transformation Values: Incoming Value transformations. This will extract the value for the current flow temperature object in the ems-esp/boiler_data telegram. As this is a temperature, you can add the Unit of Measurement if you want. In our case it is in Celsius degrees, so we add °C here.
Click CREATE if you have entered all the necessary information.
Note: Since EMS-ESP firmware version 3.6.5, the data structure has partially changed. The boiler_data_ww does not stipulate WW anymore, but it adds a nested folder called DHW. Adapt the JSONPATH like this: JSONPATH:$.dhw.flowtempoffset .
Now you have to link the channel to an item (click: Add link to Item). This is standard openHAB procedure. As soon as you save the item that you created/linked, the value will show up!
You have to repeat the step 4d for each data point you want to import.