
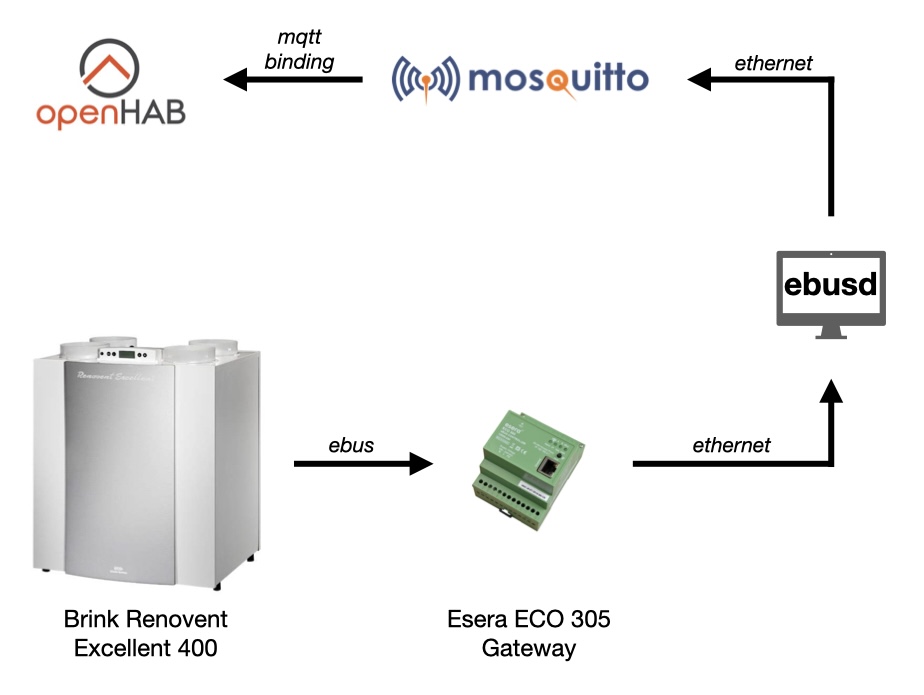
This guide documents the complete integration of a Brink Renovent Excellent 400 ventilation system through ebusd and MQTT for monitoring in openHAB.
- 28+ data points monitored every 10 seconds
- Real-time monitoring of temperatures, airflows, fan speeds
- Filter tracking (days used, volume processed)
- Bypass status and configuration
- System diagnostics (frost protection, preheater, errors)
- Operating hours and performance metrics
Hardware Requirements
- Brink Renovent Excellent 400 ventilation system
- Esera ECO 305 eBUS Controller (or compatible eBus gateway)
- 2-wire cable for eBus connection (polarity-sensitive
- Network connectivity for Esera gateway
- Proxmox server (or any Linux host) for LXC/VM
Configure Renovent for eBus Mode
Access the Renovent service menu: Use the menu button on the display to enter service mode and navigate to Parameter 08. Set to: eBus (Not OT – OpenTherme). Navigate to Parameter 09 (eBus mode) and configure Master (0) or Slave (1) mode.
The Renovent can operate as either eBus Master or Slave. Slave mode (1) is recommended for passive monitoring. If you experience issues, try Master mode (0).
I am running master mode.
Physical Connection
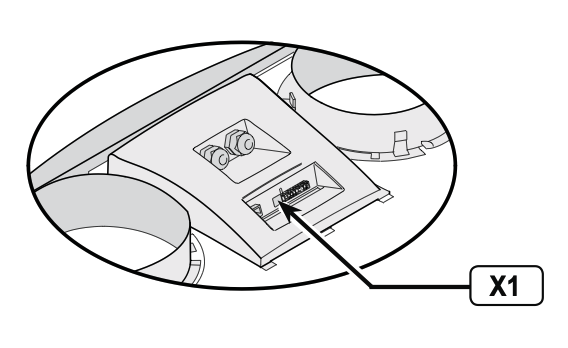
Step 1: Locate Renovent eBus Connection
CRITICAL: Find the correct connector!
X1 Connector: 2-pin green terminal block on the back of the Renovent display housing. NOT the X2 connector (used for other purposes). Refer to the Renovent service manual, page 14, for connector location diagrams.
Step 2: Connect to Esera Gateway
Wire the eBus connection: Switch off the Renovent appliance and the Esera gateway. Connect the Renovent X1 terminals to Esera eBus terminals. Polarity matters! Follow the wiring diagram. The following two pictures show which pins I connected on what device. You may use standard 2-wire cable (no shielding required for short runs). I used shielded KNX-EIB cable, as I had some spare lying around. Keep away from high-voltage AC cables. The following pictures show which pins I connected on what device.

Do NOT use termination resistors. eBus does not need termination! Termination resistors will prevent proper communication. The Esera gateway has built-in termination.
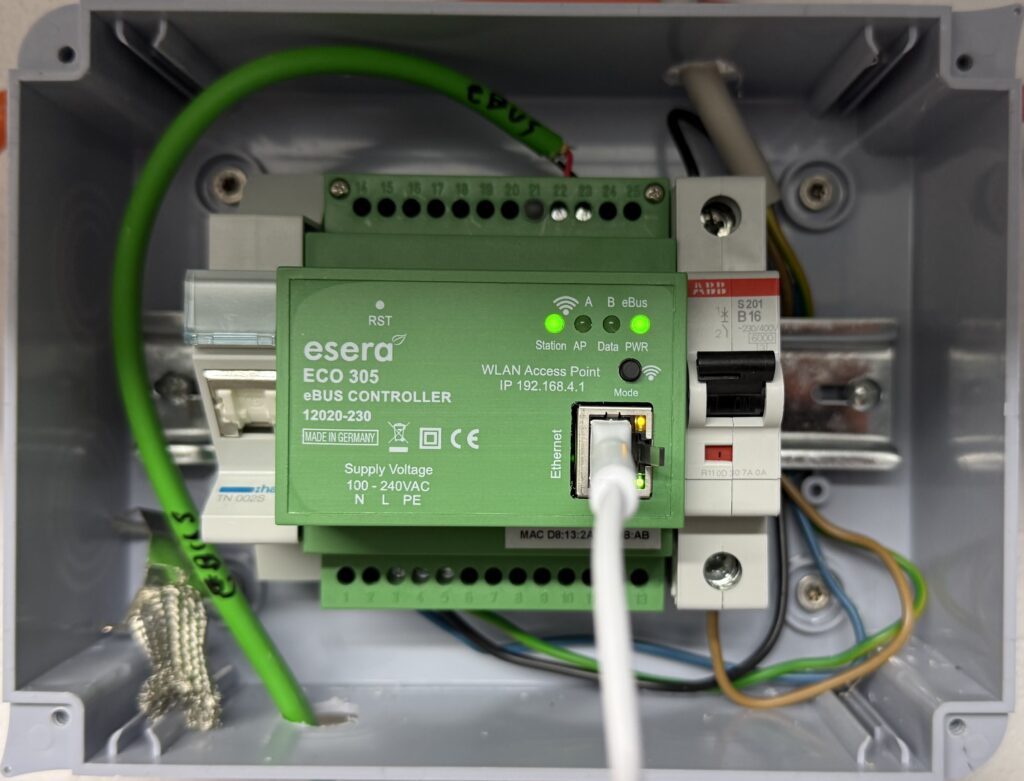
Verify the connection. Switch on both devices. LED indicators on Esera should show activity once connected.
PWR: Solid green means power OK.
Station: Solid green means that the eBus is ready.
Data: Flashing green ~1Hz (eBus communication)
Esera Gateway Setup
Step 1: Access Esera Web Interface
Connect your Esera gateway to your network. Access the web interface: `http://192.168.X.Y` (or your gateway IP). Default login password (eserapwd). Please change immediately.
Step 2: Configure eBus Settings
Navigate to: eBus Settings. You need to select:
Server protocol: TCP
Port: 5001
Automatic Bus Calibration: Automatic Mode
Calibration Value: 130 (auto-detected)
Compatibility: “Support ebusd enhanced protocol” (should be checked already)
Important: The “enhanced protocol” checkbox CANNOT be disabled – this is normal. Port 5001 uses the enhanced eBus protocol (required for ebusd). Port 5000 uses Esera ASCII protocol (not used in this setup).
Step 3: Verify Connection
Test the raw data flow. In your CLI, enter:
nc 192.168.X.Y 5001You should see binary data streaming (appears as garbled characters):
ƪƪƪƪw}@Ơƴƴƪƪƪƪ…
This confirms the Esera is receiving eBus data from the Renovent.
CRITICAL: The Esera gateway only allows ONE TCP connection at a time to port 5001! If `nc` is connected, ebusd cannot connect. Always close test connections before starting ebusd.
LXC Container Setup
Step 1: Create LXC Container in Proxmox
Here is my config:
OS: Ubuntu 24.04 LTS
Hostname: ebus
Memory: 512 MB
Swap: 512 MB
CPU: 1 core
Disk: 8 GB (minimal, only needs ~2 GB)
Network: Bridge to your LAN
Step 2: Initial Setup
SSH into your container, update your system and install wget.
ebusd Installation. Important: Always use the MQTT1 variant (includes MQTT support)
cd /tmp
wget https://github.com/john30/ebusd/releases/download/v26.1/ebusd-26.1_amd64-trixie_mqtt1.deb
Step 2: Install ebusd
dpkg -i ebusd-26.1_amd64-trixie_mqtt1.deb
# Fix any dependency issues
apt-get install -f
Step 3: Verify Installation
ebusd --version
# Should show: ebusd 26.1.26.1
Configuration Files
Step 1: Create Directory Structure
mkdir -p /etc/ebusd/enconThe encon directory is for the manufacturer ENCON (Brink’s eBus identifier).
Step 2: Obtain Renovent Configuration File
Grab the custom configuration file for The Renovent Excellent 400 from Github. Find the exact file link and WGET it into your /tmp.
Step 3: Fix Character Encoding
The original file contains German umlauts (ü, ö, ä) that cause parsing errors. Convert to ASCII:
sed 's/ü/ue/g; s/ä/ae/g; s/ö/oe/g; s/Ü/Ue/g; s/Ä/Ae/g; s/Ö/Oe/g; s/ß/ss/g' \
    /tmp/7c.renovent-excellent-400.csv > /etc/ebusd/encon/7c.csv
Verify the file:
head -20 /etc/ebusd/encon/7c.csvStep 4: Configure ebusd Service
Edit the configuration file:
nano /etc/default/ebusdAdd the following:
EBUSD_OPTS="--device=enh:192.168.X.Y:5001 \
  --latency=50 \
  --scanconfig \
  --configpath=/etc/ebusd \
  --mqtthost=10.0.10.41 \
  --mqttport=1883 \
  --mqttjson \
  --mqtttopic=ebusd \
  --log=all:notice \
  --pollinterval=10"
Parameter explanations:
--device=enh:192.168.X.Y:5001– Esera gateway with enhanced protocol--latency=50– 50ms latency compensation--scanconfig– Auto-detect and load device configurations--configpath=/etc/ebusd– Where to find CSV configs--mqtthost=192.168.A.B– Your MQTT broker IP--mqttport=1883– Standard MQTT port--mqttjson– Publish in JSON format--mqtttopic=ebusd– MQTT topic prefix--log=all:notice– Logging level--pollinterval=10– Poll interval (not used for active polling in our setup)
Step 5: Start and Enable ebusd
systemctl enable ebusd
systemctl start ebusd

# Wait 30 seconds for initialization
sleep 30

# Verify it's running
systemctl status ebusd
Step 6: Verify ebusd Connection
ebusctl infoExpected output:
version: ebusd 26.1.26.1
device: 192.168.X.Y:5001, TCP, enhanced
signal: acquired
scan: finished
masters: 2
messages: 141
address 31: master #8, ebusd
address 36: slave #8, ebusd
address 77: master #19
address 7c: slave #19, scanned “MF=ENCON;ID= ;SW=-;HW=-“, loaded “encon/7c.csv”
Key indicators of success:
`signal: acquired` (not “no signal”)
`messages: 141` (config loaded)
`address 7c: slave #19, scanned “MF=ENCON”` (Renovent detected)
`loaded “encon/7c.csv”` (configuration file loaded)
Test reading a value:
ebusctl read -c Excellent400 Aussenlufttemperatur
# Should return a temperature value like: 10.2
Polling Script
Why a Polling Script? ebusd can passively listen to eBus telegrams, but the Renovent doesn’t broadcast all values automatically. We need to actively request data.
The Challenge: Setting `poll` in CSV files doesn’t work reliably with ebusd 26.1. Solution: External polling script that calls `ebusctl read`.
Step 1: Create Polling Script
nano /root/ebus/poll_renovent.shScript content:
#!/bin/bash
while true; do
    # Temperatures
    ebusctl read -c Excellent400 Aussenlufttemperatur > /dev/null 2>&1
    ebusctl read -c Excellent400 Ablufttemperatur > /dev/null 2>&1
    ebusctl read -c Excellent400 ZusaetzlicherTemperaturfuehler > /dev/null 2>&1

    # Airflows - Actual
    ebusctl read -c Excellent400 TatsaechlicheZuluftmenge > /dev/null 2>&1
    ebusctl read -c Excellent400 TatsaechlicheAbluftmenge > /dev/null 2>&1
    ebusctl read -c Excellent400 Zuluftmenge > /dev/null 2>&1
    ebusctl read -c Excellent400 Abluftmenge > /dev/null 2>&1

    # Airflow Setpoints
    ebusctl read -c Excellent400 LuftmengeStufe0 > /dev/null 2>&1
    ebusctl read -c Excellent400 LuftmengeStufe1 > /dev/null 2>&1
    ebusctl read -c Excellent400 LuftmengeStufe2 > /dev/null 2>&1
    ebusctl read -c Excellent400 LuftmengeStufe3 > /dev/null 2>&1

    # Fan speeds
    ebusctl read -c Excellent400 TatsaechlicheDrehzahlZuluft > /dev/null 2>&1
    ebusctl read -c Excellent400 TatsaechlicheDrehzahlAbluft > /dev/null 2>&1

    # Operating Mode & Status
    ebusctl read -c Excellent400 Ventilatorbetrieb > /dev/null 2>&1
    ebusctl read -c Excellent400 StatusBypass > /dev/null 2>&1
    ebusctl read -c Excellent400 StatusVentilator > /dev/null 2>&1
    ebusctl read -c Excellent400 StatusFrostschutz > /dev/null 2>&1
    ebusctl read -c Excellent400 StatusVorheizregister > /dev/null 2>&1
    ebusctl read -c Excellent400 LeistungVorheizregister > /dev/null 2>&1

    # Switch position
    ebusctl read -c Excellent400 PositionStufenschalter > /dev/null 2>&1

    # Bypass
    ebusctl read -c Excellent400 BypassTemperatur > /dev/null 2>&1
    ebusctl read -c Excellent400 BypassHysterese > /dev/null 2>&1

    # Filter
    ebusctl read -c Excellent400 Filtermeldung > /dev/null 2>&1
    ebusctl read -c Excellent400 FilterverwendungTage > /dev/null 2>&1
    ebusctl read -c Excellent400 Filterverwendung > /dev/null 2>&1

    # Pressure
    ebusctl read -c Excellent400 IstwertZuluftdruck > /dev/null 2>&1
    ebusctl read -c Excellent400 IstwertAbluftdruck > /dev/null 2>&1

    sleep 10
done
Make it executable:
chmod +x /root/ebus/poll_renovent.shScript details:
Polls **28 data points** every 10 seconds. Each read is redirected to `/dev/null` (we only care about MQTT publication). `sleep 10` controls update frequency.
Customization: Increase `sleep 10` to `sleep 30` for less frequent updates (lower CPU usage). Remove unwanted data points to reduce eBus traffic (these are the ones I use). Add more data points from the CSV file as needed.
Step 2: Create Systemd Service
nano /etc/systemd/system/ebusd-poll.service[Unit]
Description=eBus Renovent Polling Script
After=ebusd.service
Requires=ebusd.service
[Service]
Type=simple
ExecStart=/root/ebus/poll_renovent.sh
Restart=always
RestartSec=10
[Install]
WantedBy=multi-user.targetEnable and start:
systemctl daemon-reload
systemctl enable ebusd-poll
systemctl start ebusd-poll

# Check status
systemctl status ebusd-poll
Step 3: Verify Polling
Check that values are being updated. Wait 15 seconds, then check:
ebusctl find -c Excellent400 | grep -v "no data" | head -10You should see values instead of “no data stored”:
Excellent400 Aussenlufttemperatur = 10.2
Excellent400 Ablufttemperatur = 22.0
Excellent400 TatsaechlicheZuluftmenge = 180
MQTT Integration
Verify MQTT Publishing
apt install mosquitto-clientsSubscribe to all ebusd topics:
mosquitto_sub -h 192.168.A.B -p 1883 -v -t 'ebusd/#'Expected output (updates every 10 seconds):
json
ebusd/Excellent400/Aussenlufttemperatur {
“0”: {“name”: “”, “value”: 10.1}}
ebusd/Excellent400/Ablufttemperatur {
“0”: {“name”: “”, “value”: 22.0}}
ebusd/Excellent400/TatsaechlicheZuluftmenge {
“0”: {“name”: “”, “value”: 180}}
ebusd/Excellent400/Ventilatorbetrieb {
“0”: {“name”: “”, “value”: “Normal”}}
ebusd/Excellent400/StatusBypass {
“0”: {“name”: “”, “value”: “Closed”}}
ebusd/Excellent400/Filtermeldung {
“0”: {“name”: “”, “value”: “Clean”}}
MQTT Message Format:
All Excellent400 values: `{“0”: {“name”: “”, “value”: <VALUE>}}`
Error messages: `{“error”: {“value”: “E100”}}`
Global values: May vary in format
JSON Path for extraction: $.0.value (for most messages)
openHAB Configuration
Step 1: Install Required Add-ons
In openHAB UI:
Settings – Add-ons – Bindings:
Install: MQTT Binding
Settings – Add-ons – Transformations:
Install: JSONPath Transformation
Install: MAP Transformation
Install: REGEX Transformation (for multi-value fields)
Step 2: Configure MQTT Broker Thing
Settings → Things → + → MQTT Binding → MQTT Broker
Configuration:
Broker Hostname/IP: 192.162.A.B
Port: 1883
Client ID: openhab
Save and ensure status shows ONLINE.
Step 3: Create VMC MQTT Thing
Settings → Things → + → MQTT Binding → Generic MQTT Thing
Thing ID: MqttVMC
Label: VMC MQTT
Bridge: Select your MQTT Broker
Step 4: Add Channels
For each data point, add a channel. Here is one example:
Channel ID: VmcAussenlufttemperatur
Label: VMC Aussenluft Temperatur
Channel Type: Number Value
State Topic: ebusd/Excellent400/Aussenlufttemperatur
Incoming Value Transformations: JSONPATH:$.0.value
Unit of Measurement: °C
Here is a different example. Error uses different JSON path: $.error.value instead of $.0.value:
Channel ID: VMC_errorCode
Label: VMC Error Code
Channel Type: Text Value
State Topic: ebusd/Broadcast/Error
Incoming Value Transformations: JSONPATH:$.error.value
Step 5: Create MAP Transformation Files
Bypass Status Map: /etc/openhab/transform/vmc_bypass.map
0=Initializing
1=Opening
2=Closing
3=Open
4=Closed
5=Error
6=Calibrating
255=Error
-=Unknown
NULL=Unknown
UNDEF=Unknown
Filter Status Map: /etc/openhab/transform/vmc_filter.map
0=Clean
1=Dirty
Clean=Clean
Dirty=Dirty
-=Unknown
NULL=Unknown
UNDEF=Unknown
Switch Position Map: /etc/openhab/transform/vmc_switch.map
0=Standby
1=Position_1
2=Position_2
3=Position_3
Position_0=Standby
Position_1=1
Position_2=2
Position_3=3
-=Unknown
NULL=Unknown
UNDEF=Unknown
Step 6: Link Channels to Items
For each channel, create an Item and link it:
Settings → Items → Create Item
Select “Link to Channel”
Choose the VMC MQTT Thing and specific channel
Configure Item:
Type: Match channel type (Number/String)
Name: e.g., `VMC_Aussenluft_Temperatur`
Label: e.g., `Outside Temperature`
Category: Choose appropriate icon
State Description Pattern: Add MAP transformation if needed
- Example: `MAP(vmc_bypass.map):%s` for bypass status
Step 7: Understanding multi-value fields
Some values return multiple fields separated by semicolons:
Format: Current;Min;Max;Step;Default
Example: FilterverwendungTage returns 6;0;32767;1;0
- Current: 6 days
- Min: 0 days
- Max: 32767 days
- Step: 1 day
- Default: 0 days
This was one of the most complicated configurations I went through until now.