
In search to connect our Buderus boiler (heating, warm water system, hot water solar panels) to openHAB, I stumbled over an EMS gateway developed by a dutch engineer.
1. Installing the EMS gateway
I ordered the Wifi edition and connected it via the mini-jack cable to the boiler system. The boiler system also delivers power to the gateway over this cable.

The connection to the WIFI network was straight forward (chapter 8.1 of the manual) and the gateway automatically detected all the devices connected to our boiler. It immediately started displaying live data from the boiler.
2. Setting up an MQTT broker
We will use MQTT to send the boiler data to the openHAB system: the EMS gateway will send the boiler data to the MQTT broker which relays it onto the network. openHAB then needs to listen to this telegrams and interpret them.
Installing Mosquitto in an ubuntu VM was straight forward:
sudo apt-get install mosquitto mosquitto-clientsIf you run the MQTT broker behind a firewall, it might not be necessary to force authentication. Entering the IP address and port of the MQTT broker in the gateway was straight forward. Do not forget to define a base, a kind of a channel on which MQTT will broadcast your telegrams. I chose ems-esp. The gateway then immediately began sending the boiler data to the broker.
3. prepare openHAB to receive and treat the incoming data
3a: Go to openHAB’s administration settings, Add-ons: Bindings and install the MQTT binding.
3b. Go to openHAB’s administration settings, Add-ons: Other Add-ons, Transformation Add-ons and install the JSONPATH Transformation.
4. Configure openHAB to receive the MQTT telegrams
4a.1: From this step on, you can either add a “HomeAssistant MQTT Component” which auto-detects all EMS things. In order for this to work, you need to activate the “MQTT Discovery (Home Assistant, Domoticz)” in the MQTT settings in the EMS gateway.
4a.2: I decided to go the manual way to have full control over the things and items to add to openHAB.
You need to add an MQTT Broker bridge. Go to the things tab and add a thing based on the MQTT binding. Select MQTT Broker. Enter the IP address of the MQTT broker. Save.
4b. Then add a Generic MQTT Thing. I linked it to the above created bridge. To have a better overview, I created a generic thing for the boiler, one for the warm water and one for the solar data.
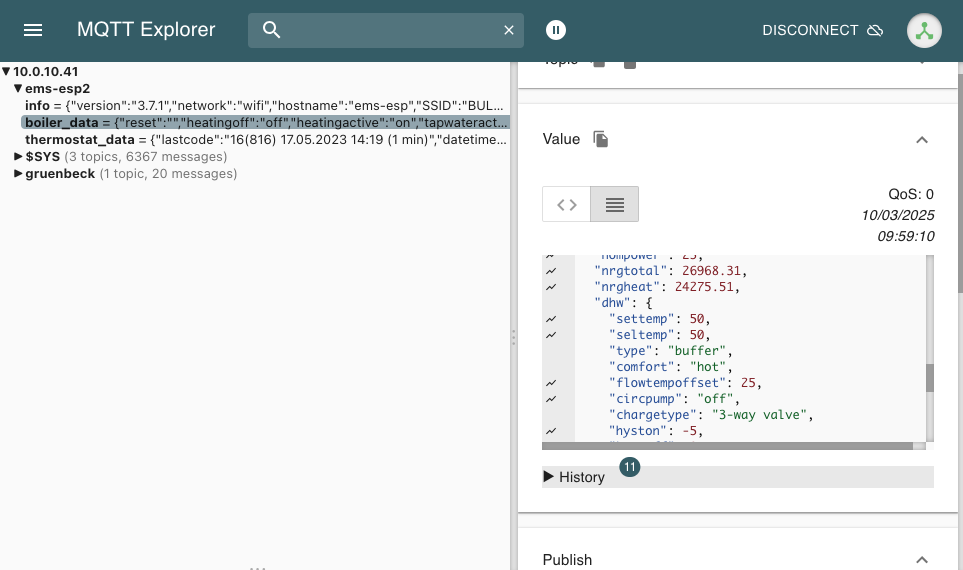
4c: Now you have to add the data points that you want to import into openHAB as items. If you don’t know which data points are available, use an MQTT Explorer to get a better insight into your data.

4d: For each data point, you need to define a channel in openHAB. Open the MQTT generic thing that you created, click on the channel tab, and click add channel. Add the channel identifier, the label and select the corresponding channel type. In our example, we select Number Value, as we want to catch a temperature value.

The MQTT State Topic‘s first part is the base that you defined in the MQTT broker settings in the EMS gateway. In our case: ems-esp. The second part of the topic gives more details about the object you want to catch. Your MQTT explorer will help you determine which information telegrams are available.
In order to precise which value of the current object you want to import, you have to click the Show advanced check box.

As the object information is received in JSON format, you have to use JSONPATH Transformation to catch the exact value that you need (do not forget to install the JSONPATH tranformation, see 3b above). In our case, enter JSONPATH:$.curflowtemp under Transformation Values: Incoming Value transformations. This will extract the value for the current flow temperature object in the ems-esp/boiler_data telegram. As this is a temperature, you can add the Unit of Measurement if you want. In our case it is in Celsius degrees, so we add °C here.
Click CREATE if you have entered all the necessary information.
Note: Since EMS-ESP firmware version 3.6.5, the data structure has partially changed. The boiler_data_ww does not stipulate WW anymore, but it adds a nested folder called DHW. Adapt the JSONPATH like this: JSONPATH:$.dhw.flowtempoffset .
Now you have to link the channel to an item (click: Add link to Item). This is standard openHAB procedure. As soon as you save the item that you created/linked, the value will show up!
You have to repeat the step 4d for each data point you want to import.